
Tuesday, October 9, 2012
Dreadies
Saturday, June 23, 2012
Overnight beach waves
Want to know how to make your hair perfectly wavy without heat?
I LOVE this trick, the waves turn out beautifully.

I LOVE this trick, the waves turn out beautifully.
Take a shower at night, and apply some curl defining mousse to the ENDS of your hair. Make sure you don't add any to the roots as it can make your roots look oily.
Separate your hair into 4 different sections and braid each section all the way down and secure with an elastic. I french braided each section in hopes that it would make the roots more curly, but you can braid your hair regularly and still get the same effect.
Once your hair is all braided... go to sleep! Its best to sleep on a satin pillow case or with a satin sleep cap to avoid frizziness.
When you wake up.. make sure your hair is pretty dry before you take out the braids.
Mine wasn't completely dry so I did my makeup before I took the braids out... at this point it still wasn't all the way dry so I took my hair dryer and dried the braids a bit. Then I took all the braids out and used my fingers to blend all the hair together and to give my roots some volume.
Tada!! Perfect beachy waves that are super easy and don't damage your hair!
Easy and Glamorous
I recently came up with an Easy and Glamorous eye makeup look.
Heres a picture of the finished product.


Heres a picture of the finished product.
First I use my urban decay primer potion in greed, and then I apply a white shimmery color like Phloof! by MAC all over my entire lid up to the eyebrows as well as in my inner corners. I then use a color similar to my skin tone on my crease, I used Honesty by MAC.

Once you've applied this color to your crease blend really well. Then take a black gel eyeliner like fluid line by MAC and apply a thick line to your upper lash line as close to your lashes as possible. No need to worry about imperfections, it can be sloppy and won't affect the look at all.
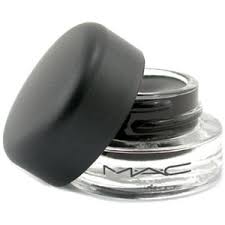
Next take a dark brown or a black eyeshadow, I used Twinks by MAC, and apply the eyeshadow over the eyeliner using a flat eyeshadow brush to blend the shadow into the liner.
Then use the eyeshadow brush you use for your crease (I use MAC's 217) to blend the crease area of your eye. You could skip this step if you want, but I like to make sure that the dark brown isn't too far up in my crease area. This look works best if the darkest color is near your lash line and it gradually gets lighter as it goes up towards your eyebrow.
Then apply mascara and your done. :)
This is my current go to look when I want to wear a little makeup, but not put too much effort into doing my makeup carefully.
And if you're wondering what lipstick I'm wearing in the picture at the top of this post, its creme cup by MAC, I mentioned it in a previous post.
Wednesday, June 20, 2012
New mommy makeup tricks
Wow, it's been a while since I posted last!
May 23rd I had my second baby, so I've been plenty busy and haven't thought much about blogging until recently. I'd like to start writing more!
So here goes...
For those of you with kids, you know how exhausting a new baby can be.. So I haven't been going "all out" with my makeup lately, instead I've been improvising quick tricks that look great.
This is currently my favorite product, MAC's mineralize skin finish powder. I have a lot of scaring on my face, and this hides all of my imperfections really well. This powder is pretty heavy coverage, but doesn't feel heavy or cakey when you're wearing it.

 I use a small kabuki brush and work it in circles to apply the powder to problem areas. Then I take a large face brush and apply a light dusting of the powder over my entire face to even everything out. Its a very quick and easy way to perfect your uneven skin.
Next I take a blush and apply it to the apples of my cheeks, I still love Dainty by MAC, it goes well with my skin tone.
And as discussed in previous posts, I then use an angled brush and Espresso eyeshadow by MAC to perfect my eyebrows.
For my eyes I normally take the same color I use on my eyebrows and the same angled brush and I put a thick line of brown on my lash line, and I use my finger to smudge it out a bit. I make sure that its the darkest & thickest towards the outer corner of my eye. This creates a very natural looking smokey kind of look. I will sometimes line my lower lash line depending on how tired I look, lol. Just use the same angled brush to apply the eyeshadow right on your lower lashes and use your finger to smooth any imperfections.
Then apply mascara and your eyes are finished.
I typically wear lipstick also, what color I choose depends on how dramatic I want my makeup to look. This entire look is very played down, so to stick with that natural look I will use Creme cup lipstick by MAC

May 23rd I had my second baby, so I've been plenty busy and haven't thought much about blogging until recently. I'd like to start writing more!
So here goes...
For those of you with kids, you know how exhausting a new baby can be.. So I haven't been going "all out" with my makeup lately, instead I've been improvising quick tricks that look great.
This is currently my favorite product, MAC's mineralize skin finish powder. I have a lot of scaring on my face, and this hides all of my imperfections really well. This powder is pretty heavy coverage, but doesn't feel heavy or cakey when you're wearing it.

Next I take a blush and apply it to the apples of my cheeks, I still love Dainty by MAC, it goes well with my skin tone.
And as discussed in previous posts, I then use an angled brush and Espresso eyeshadow by MAC to perfect my eyebrows.
For my eyes I normally take the same color I use on my eyebrows and the same angled brush and I put a thick line of brown on my lash line, and I use my finger to smudge it out a bit. I make sure that its the darkest & thickest towards the outer corner of my eye. This creates a very natural looking smokey kind of look. I will sometimes line my lower lash line depending on how tired I look, lol. Just use the same angled brush to apply the eyeshadow right on your lower lashes and use your finger to smooth any imperfections.
Then apply mascara and your eyes are finished.
I typically wear lipstick also, what color I choose depends on how dramatic I want my makeup to look. This entire look is very played down, so to stick with that natural look I will use Creme cup lipstick by MAC

Sunday, January 15, 2012
Long time no post..
So as it turns out its been a few months since I last posted anything in here.
I just thought I'd stop in to tell you guys about an everyday easy makeup routine.
Heres what I do on a daily basis:
After washing my face I apply moisturizer, and let it settle into my skin.
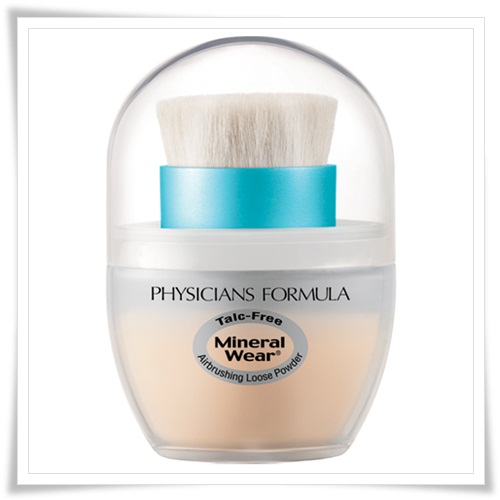
Then I apply physicians formula air brushing powder all over my face, specifically in problem areas.


I just thought I'd stop in to tell you guys about an everyday easy makeup routine.
Heres what I do on a daily basis:
After washing my face I apply moisturizer, and let it settle into my skin.
Then I apply physicians formula air brushing powder all over my face, specifically in problem areas.
I love this product! It works a lot like bare minerals, but its a fraction of the price.
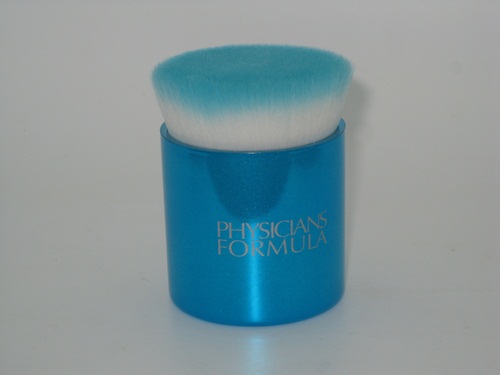
I use the included kabuki brush to blend powder into problem areas and my big fluffy brush to blend everything together seamlessly.
The big fluffy brush is on the left, I normally use the smaller brush for blush or bronzer.
The big fluffy brush is on the left, I normally use the smaller brush for blush or bronzer.
Then once my foundation is applied, I will smile "with my cheeks" if that makes sense.. and I apply a small amount of blush to the inner area where my cheeks stick out when I smile.


I don't know if you can see where I circles my cheeks in this pic, but thats the basic area you apply the blush with the smaller brush... then you use the larger brush to blend the blush around that basic area.
Then I use espresso by MAC
and I take an angled brush
and take a little on the brush, and fill in my eyebrows, accentuating the shape I like them to be.
This is pretty much my basic makeup.. When I'm doing something where I want to wear more eye makeup I will apply primer and do my eye shadow as planned.
But for a more simple and easy look, I will take the same angled brush and espresso by MAC.. and I just apply winged eyeliner on my top lash line.. and sometimes my bottom lash line also is I'm looking tired that day. Then I finish with mascara. I typically use cover girl lash blast fusion, its a great drug store mascara:
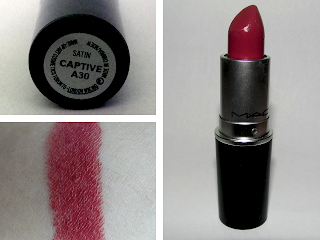
One of my recent obsessions is lipstick in natural looking tones. I really love berry tones, so naturally I love this one I got recently:
Captive by MAC
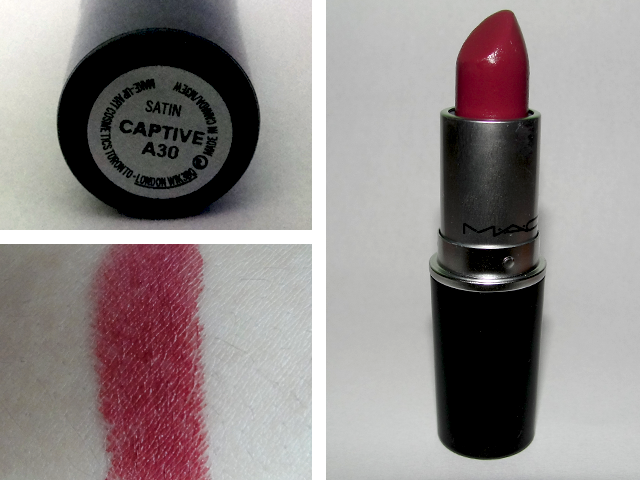
It looks very natural when its on, and I really love MAC lipsticks, they are really smooth and creamy.. and the color doesn't transfer easily, but stays on your lips for a surprisingly long time.
When I apply lipstick, I start by putting on chap stick. typically I put the chap stick on after I finish my foundation... But sometimes I forget and I put it on right before I put on lipstick.
I just wipe off the excess, but make sure there is still some greasiness to your lips before applying the lipstick.
Then you're finished. :)
All of the images used in this post were found on Google Images. (Aside from the picture of myself showing where I apply blush)
Friday, July 29, 2011
70s makeup
My mom is a personal trainer, and today at the gym was "70s flashback."
The person with the best costume would win $20, and it was mandatory to dress up today.
So my mom had me come over and do her hair and makeup for the day.
Here are the pictures of my beautiful mother after her "makeover"


I was going to a "twiggy" eye shadow look. I started out by putting urban decay primer potion all over the lid, then I put shroom by MAC (as previously discussed) all over the entire lid. I then used a purple shade of MAC eye shadow (sorry I forgot the name of the color since it belongs to my mom!) Then I used several different shades of brown out of the manly 120 palette to achieve a nice dark brown solid line in the crease as twiggy might have had. Then I used the black from my manly 120 on the crease to really make that area dark.

I know Twiggy was famous for the way she drew on her bottom lashes, but my mom said this was too dramatic a look for her, since she had to wear it around a while at work.
So after creating a very dramatic crease somewhat like Twiggy's, I used my mom's MAC Penultimate liquid eyeliner pen to create the winged eyeliner on her top lashes, then i very lightly drew on the bottom lashes using a benefit waterproof eye pencil. Then I had my mom do a couple of coats of mascara, and she quickly straightened her hair.
I then teased her hair up using my boar bristle brush (this brush is amazing for teasing!!)

The person with the best costume would win $20, and it was mandatory to dress up today.
So my mom had me come over and do her hair and makeup for the day.
Here are the pictures of my beautiful mother after her "makeover"


I was going to a "twiggy" eye shadow look. I started out by putting urban decay primer potion all over the lid, then I put shroom by MAC (as previously discussed) all over the entire lid. I then used a purple shade of MAC eye shadow (sorry I forgot the name of the color since it belongs to my mom!) Then I used several different shades of brown out of the manly 120 palette to achieve a nice dark brown solid line in the crease as twiggy might have had. Then I used the black from my manly 120 on the crease to really make that area dark.
I know Twiggy was famous for the way she drew on her bottom lashes, but my mom said this was too dramatic a look for her, since she had to wear it around a while at work.
So after creating a very dramatic crease somewhat like Twiggy's, I used my mom's MAC Penultimate liquid eyeliner pen to create the winged eyeliner on her top lashes, then i very lightly drew on the bottom lashes using a benefit waterproof eye pencil. Then I had my mom do a couple of coats of mascara, and she quickly straightened her hair.
I then teased her hair up using my boar bristle brush (this brush is amazing for teasing!!)
She was scared I would tease it too much, so I had to limit myself. :(
I desperately wanted to make a 60s bee hive!! :((

I desperately wanted to make a 60s bee hive!! :((
Tuesday, July 26, 2011
Vacation Weekend Makeup

So on Friday night I left to go to a party out of town. Luckily, right before I did my eyeshadow.. I got the mail and discovered that my new urban decay primer potion in "greed" had finally arrived. So the look you see above was friday night, and the first time using the primer potion. I must say, I am absolutely in love with this stuff!

When we were done swimming, I went to a friends house to change my clothes and get ready for the party we planned to go to later that night. So again, I needed to clean up my makeup and make it a little more dramatic for the night. I first wiped off all of the makeup that was remaining from the lake, and then I used a little more primer potion. Then I used Retrospek again all over the entire eyelid and used Brun to highlight my crease. Then i used the maybelline gel eyeliner for my top lash line, with Brun over the top to "lock the liner in place" as well as the bottom lash line. And by this point, I had put mascara on every time i fixed my eye makeup... So now I had around 4 coats of mascara, and my eyelashes were INCREDIBLY long. It was amazing, they looked like fake eyelashes!
I was so amazed with how well my eye makeup turned out all weekend, but I really wish I had taken some pictures of my makeup through out the weekend!
Subscribe to:
Posts (Atom)
